),
then your Touch Screen is off. If
you'd like touch screen on, please return to the Serve
Breakfast/Lunch screen to turn it on. To
serve using the keyboard (Touch Screen Off), please go to Serving
Using a Keyboard.
),
then your Touch Screen is off. If
you'd like touch screen on, please return to the Serve
Breakfast/Lunch screen to turn it on. To
serve using the keyboard (Touch Screen Off), please go to Serving
Using a Keyboard.
These are instructions on how to serve with Serving Screen v 2.0 and Touch Screen On.
If numbers
are displayed with the Menu description (i.e.
),
then your Touch Screen is off. If
you'd like touch screen on, please return to the Serve
Breakfast/Lunch screen to turn it on. To
serve using the keyboard (Touch Screen Off), please go to Serving
Using a Keyboard.

If CEP Quick Serve is selected on the initial serve screen, a window will display over the serve screen.
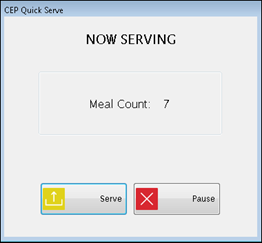
Click the Serve (F7) button for each CEP meal served.
Click the Pause (F10) button to serve using the regular serving screen.
Begin by selecting the student. There are several ways to do this.
Touch  to open the pop-up keyboard:

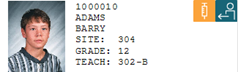
The cell of the student who is being served is highlighted in the queue and their information will be displayed at the top with a special message, if it exists:

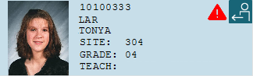
The text shown here in red is a Special Message, which is entered in Account Setup.
If it is the student’s birthday, “Happy Birthday” will display in red text next to the Student # field, which is enabled in Site Setup.
The queue displays student cells are added to the queue as they are entered manually or by external devices. The student information includes:
Serving Number, Special Message Indicator, How student was entered into the Queue
Last Name
First Name
Student's Site ID
Grade
Teacher (shortened to Teach to allow enough room for the teacher’s name)
|
|
|
This is the symbol for a Manually Keyed-in Student. The Cashier can, via the keyboard, insert a student into the queue and that student will go to the top of the line.
|
|
|
|
These are the symbol for a Queued Student (arrow indicates direction of device). The students will be added to the queue in the order they were inputted.
|
|
|
|
Allergens Indicator. This is where any food allergies will be displayed.
|
|
|
|
To remove from queue just Click/Touch and F8/Clear.
Invalid Stu# will be removed automatically. |
|
|
|
Special Message Indicator. This is where any special messages entered (i.e. low salt diet, no extras, etc.) |
NOTE: Invalid Student numbers will show up in the student cell with the invalid number labeled and an Invalid student icon.
NOTE: If an allergy is assigned to a student and displays here, a warning message will display on the serving screen when that student’s information is entered. Click OK to continue serving. To activate this function, click the box on the Control File screen.
Next, select the items the student is getting.

- The Total Due and Pending Balance will be updated as you select the items
Tabs
The Item Selection Grid can have up to four tabs in the online version and only displays the All tab in the offline version.
The All Tab is always there and in the first position.
The other tabs and item colors are set up in Item Setup: Color Manager: Item Category.
Font Size
The font size is controlled by the cashier. There are three different sizes to decide fromwith the default size being the smallest.
To
change the font size, click the  button. The size choices loop, so
to reduce the font size just continue to click until you get to the
desired size.
button. The size choices loop, so
to reduce the font size just continue to click until you get to the
desired size.

Pending Balance displays the account balance the student had when this transaction began and updates when menu items are selected.
Next, enter the Amount Paid. To enter the amount, touch the $ buttons in the Payment area. You can use any combination of entries to add up to the Amount Paid.Example:To enter $25, you could touch $20 and then $5, or touch $5 five times.
Click OK to continue and complete the previous transaction.
The $100 button can be enabled or disabled in Security: User Group.
 button to issue a refund to a student using the touch screen. Enter the amount to be refunded in the Amount Paid text field, touch the +/- button and then touch the Account button.
 if you are giving the change back to the student.
 Shortcut: If they are paying exact cash, you can touch Cash before any $ buttons to check out immediately. (You don’t need to enter the Amount Paid if you use the Cash button.)
Touch
 if
the student is paying with a debit or credit card at the register.
if
the student is paying with a debit or credit card at the register.
This setting is district-wide. To have the button be available for some sites, and not others, you’ll need to create a new user group (i.e. Cashier with debit/credit) for those sites to use the Credit button.

Touch  to apply the change to the
account balance.
to apply the change to the
account balance.
The
 button will refresh the screen so you
can start over on a transaction.
button will refresh the screen so you
can start over on a transaction.
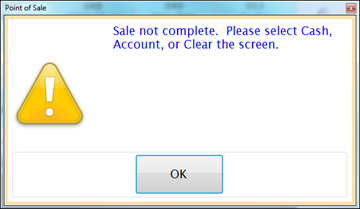
When the charge policy is set to Strict Meals Only (S), and a student attempts to purchase a reimbursable meal and an a la carte item (or a la carte only) with a negative balance, the following message will display.

Receipt is a toggle button. If it is , it will automatically
send a receipt to the default printer. Click
 to turn this feature off.
Select
a student cell in the queue and click the  button to show the completed Serving
transactions, the most recent on top.
button to show the completed Serving
transactions, the most recent on top.

Select
a student cell in the queue and click  to put the
historical transaction on the serving screen, one at a time, the most
recent on top. From
here, the cashier has the capability to VOID
a historical transaction.
to put the
historical transaction on the serving screen, one at a time, the most
recent on top. From
here, the cashier has the capability to VOID
a historical transaction.

Field changes in Review Mode
Total Due displays the cost of the reviewed transaction.
Amount Paid displays the amount applied towards current Total Due.
Check Number displays the check number, if applicable.
Change displays the change owed from the reviewed transaction.
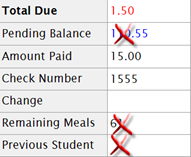
Click Clear to exit out of review mode.

This displays the number of Reimbursable Meals served for the serving date/meal type. It will automatically update after a completed transaction.
©2019 EMS LINQ, Inc.
POS Version 9, revised 04/2019