
The Item table is a list of all items served, with corresponding prices and nutritional information.
There is one item table for all schools in the district. This will ensure that items are managed and priced consistently for all schools in the district.
You can control which items each cashier serves under Item Access Setup.
Complete the following form to set up an item:
Search by: Description
Enter a description in this field to search for a specific item.
View B, L, O, or ALL

Click B, L, or O (Breakfast, Lunch, or Other) if you just want to see one type of item at a time. Click ALL to view all items.
Displays items based on Search by: or chosen View.
Item ID
If you are adding a new item, select B, L or O (Breakfast, Lunch, or Other) and enter a 3-digit number to identify the item. (You do not need to enter leading zeroes. Numbers will automatically be formatted as 3 digits; for example, if you enter a 2, it will become 002.)
 NOTE:You
can number the items any way you like. However, if you want it to convert
supplemental sales to reimbursable breakfasts or lunches, you must have
item number 001 as nutrition
code 1 for Breakfast / Lunch.
NOTE:You
can number the items any way you like. However, if you want it to convert
supplemental sales to reimbursable breakfasts or lunches, you must have
item number 001 as nutrition
code 1 for Breakfast / Lunch.
If you are not using a touch screen, we recommend using matching numbers for items that are served frequently during breakfast and lunch, since cashiers will be entering item numbers when serving. (Example: Milk could be item number 003 at both meals.)
Description
This is the full description of the item. It accepts up to 30 characters.
Short Desc
You can enter an abbreviated description here for use on the serving screen. If you leave this blank, it will use the first 15 characters of the long description.
Nutrition Code
Select a nutrition code for this item. This determines whether the item is reported as a meal, a meal component, or a supplemental sale. (You can also set custom colors based on Nutrition Code. Please see details below.)
Alternate Item
This is used with Offline Mode. It only applies to reimbursable meals (Nutrition Code 1).
If a student is served multiple reimbursable meals in the same serving day, the alternate item will be substituted when the offline transactions are synchronized with online data.
The alternate item must be a Nutrition Code 2 item.
Convert Amount
Convert Amount allows the user to assign a serving size, defined by grade, for fruit and vegetables.
Click
 to enter amounts that can be assigned
to fruits and vegetables.
to enter amounts that can be assigned
to fruits and vegetables.

Click the green plus sign to add a convert amount.
Select a grade from the Grade dropdown list.
Enter an amount in the Convert Amount field.
Click Save.
Item Category
Once a color has been assigned to an Item Category, it will show in this dropdown list so it can selected.

Color Manager

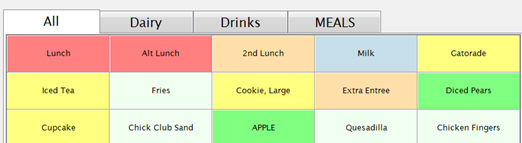
On the serving screen, items are color-coded based on the Nutrition code. The pre-installed default colors are:
To change the color settings for your entire district:
Click Color Manager to open the color configuration screen.
Select Nutrition Code or Item Category from the dropdown list.
Nutrition Code
To change a color, click the Edit Color button. You will get a screen where you can select a different color for that nutrition code. You can also define and save custom colors.
When you are done, click Save. To undo changes, click Reset to Default Colors.

When you are finished, click Close.
Item Category
Click to the green plus button to create an Item Category and assign a background color.
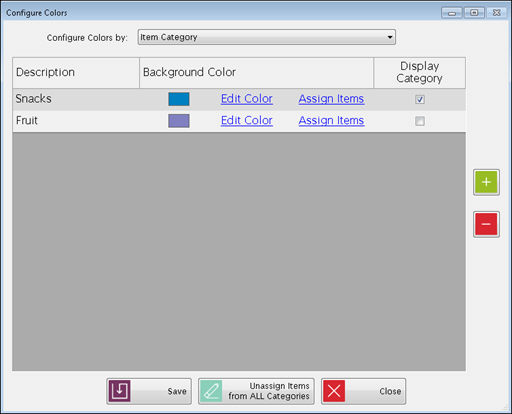
Click Edit Color to select a background color.
Click Assign Items to assign items to the category. Select items from the grid by checking the box next to the item.

Check the box in the Display Category column if you want the item category to display on its own tab on the serving screen. This groups like items together, making them easier to find.
Click Save to save the information. Click Close. The new Item Category will now appear in the dropdown list on the form.
Click Reset Item Categories for all meal items to restore default settings.
Grade

Grade 00 is the default value that will be used if the grade is not specified.
If the same prices apply for all grades, you do not need to set up any more grade rows here.
Click the green plus sign to add extra rows if you want to set up Pricing by Grade.
Then you can select a grade from the dropdown list. The prices on that line will be used for that grade only.
Price
State Reimbursable
Check here ONLY if this item qualifies for extra reimbursement from state or local sources (in addition to federal reimbursement). Only Breakfast and Lunch items with Nutrition Code 1 can be flagged as State Reimbursable.
To print a report of State Reimbursable meals served, use the Participation report and check the box to “Include Special Milk and State Reimbursable.”
Prohibit Item by Status

This allows you to prohibit sales of this item for a group of accounts, based on status code.
Example:if an item is not to be served to students, select that item, click Prohibit, and check the boxes for Free, Reduced and Student (Paid.)

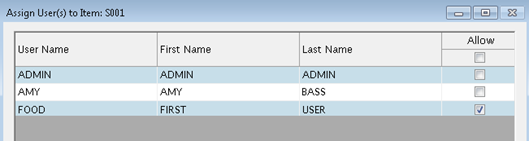
Assign Users to Items
 to set the users’ item access for this item only. You will see a list of all users.
You can set up your item file to automatically convert supplemental sales into a reimbursable meal if it meets the Offer Versus Serve guidelines. This only works for student accounts (status 2, 3, and 4). It uses the site’s ‘Offer vs. Serve Meal’ B or L item number 001 to determine the meal price.
The meal price is the same regardless of how many components they get (up to the maximum allowed).
If they are getting additional single or combo items that are not included in the reimbursable meal, it will add those prices to the Total Due, based on the order in which the items are entered.
 If you do not want to use the conversion feature, just
use nutrition code X for all your a la carte items instead of the component
codes M, P, V and B.
If you do not want to use the conversion feature, just
use nutrition code X for all your a la carte items instead of the component
codes M, P, V and B.
©2018 EMS LINQ, Inc.
POS Version 9, revised 03/2018