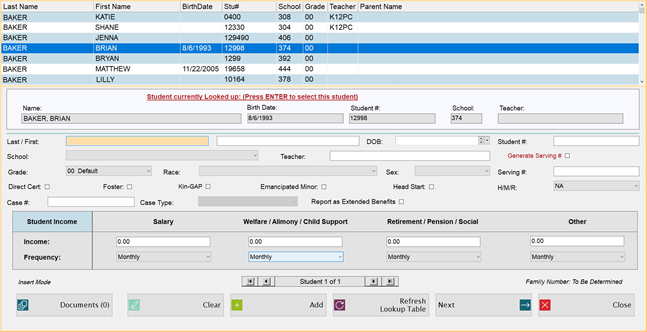
Student information is entered first.
Displays all the students in your Meals Plus database who do not have a Free and Reduced application on file.
Enter the student’s Last /First name, Student #, and Schoolin the appropriate text fields.
Enter the student’s birthdate in the Birth Date/DOB text field, if desired.
Or,

After selecting a student, you can make changes if you need to. If you edit an existing student's information on this screen, it will also change that student's information inPOS.
If you do not see a student listed, click
 to
refresh the lookup grid.
to
refresh the lookup grid.
If the student does not already exist in your database, you will need to enter the student’s Last / First name and Student # and select the School. Teacher and Grade are optional but recommended. Adding a student here will also add the student to POS.
Click the
 button (visible
only if a student has been selected from the grid) to open
the student’s POS:
Student: Account Setup form.
button (visible
only if a student has been selected from the grid) to open
the student’s POS:
Student: Account Setup form.

Select the student’s Race and Sex from the dropdown lists if desired. They are optional fields. If these fields are left blank, they default to No Response.
The Serving # is an ID number that is used for serving this student in POS. (Since Student ID can be up to 12 digits, some schools prefer to use a different ID number for serving in the cafeteria.)
 Using one student’s Student Number as another student’s Serving Number is not recommended. You will get a warning message if this happens; you should select a different Serving Number if possible.
If this is a new student, you can check Generate Serving # to assign one, based on the settings in the System Management control file. (It will show as TBD until you save the application.)
If this is a new student, and you do not check Generate Serving #, it will use the Student number as the Serving number.

Check the Direct Certified box ONLY if the student you are entering is Direct Certified (based on information you received from the social services agency).
Check the Foster box ONLY if this student is a foster child.
Check the Kin-GAP box ONLY if the student qualifies for the Kinship Guardianship Assistance Payment Program.
Check the Emancipated Minor box ONLY if the student is an emancipated minor who is legally allowed to submit his or her own application.
Check Head Start if the student is enrolled in Head Start.
Select a category from the Homeless/Migrant/Runaway dropdown list only if you have confirmation from your Homeless Liaison that this household qualifies as Homeless, Migrant or Runaway. All the students in the household will be approved for free meals and the application is exempt from verification. Leave the dropdown at NA is none of these apply.
If this student receives SNAP (Food Stamps), FDPIR or TANF, enter the case number in the Case #: text field. If they do not receive SNAP, FDPIR or TANF, leave this blank.
 Any student with a case number is categorically eligible and will
be automatically approved for free meals.
Any student with a case number is categorically eligible and will
be automatically approved for free meals.
Select Other, Medicaid, TANF, SNAP, FDPIR (these are entered and shipped by Meals Plus and can be disabled) or any user-defined case type from the Case Type dropdown list.
Check the Report as Extended Benefits box to display the student on the Extended Benefits Report. It will not affect their Categorical or DC status.
Benefits will be extended automatically to all eligible students in the household with exceptions to H/M/R, Head Start and Foster/KinGap students.
NOTE: When a new application is added, the student that is selected when a Case Type is added is not marked as Extended Benefits; other students on the application with no Case Type are 'Extended'.
STUDENT INCOME SECTION
If the student has income, enter the amount and frequency in the Student Income section.
Click  to add documents to the application. For
detailed instructions for the Document Cabinet, please see Manage
Application.
to add documents to the application. For
detailed instructions for the Document Cabinet, please see Manage
Application.
Click
 .
.

When
all students and their personal income have been entered, click  to go to
the household screen.
to go to
the household screen.
©2019 EMS LINQ, Inc.
Student Eligibility, revised 7/2018