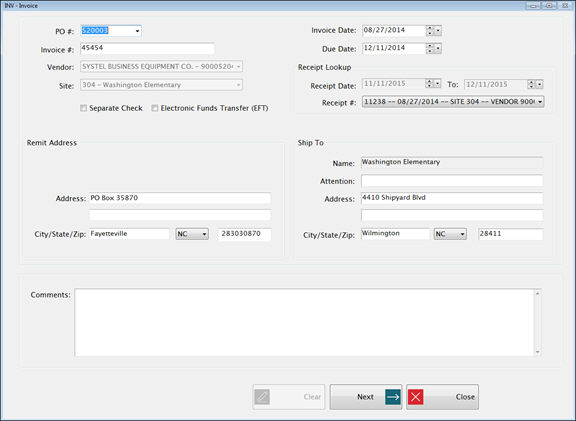
Invoice Header is the first of three screens.
Enter a unique invoice number in the Invoice # field.
If Receiving has already been done for this invoice, you can leave the invoice number blank and it will be filled in when you select the Receipt #.
Why is a unique invoice number required?
This is done to prevent paying the same invoice more than once by mistake.
If there is a valid reason why the same invoice for a vendor needs to be processed more than once, you will need to make each invoice number unique (possibly by adding additional characters at the end). Check with your finance department if you have any questions on local policies that may apply.
If the PO # invoice references a Purchase Order number, select it from the dropdown list. The dropdown list shows all open POs.
If a PO is selected, it will fill in the Vendor and Site automatically.
If there is no PO for this invoice, select the Vendor from the dropdown.
o The Vendor must be mapped to a general ledger vendor under Vendor Setup.
If there is no PO for this invoice, select the Invoice Site from the dropdown.
Enter the date of the invoice in Invoice Date field.
o It will default to today’s date (or the Receipt date if one is selected) but it can be changed if necessary.
Enter the date the payment is due in the Due Date field.

If multiple receipts exist for one PO#, select a Receipt # from the dropdown in the Receipt Lookup section. It will fill in the Invoice # from the Receipt.
o If Receiving has been done without a PO, and the invoice has not been accrued yet, select the Site and then select the Receipt # for the invoice. The Invoice #, Vendor, Site and Date from the Receipt will be filled in.
Filtering Receipt Lookup:
o If a Site is selected on the left, Receipts will filter on that site.
o Date Range filters can used to change the date selection.
Remit Address and Ship To Address will be filled in automatically from Vendor and Site setup.
o You do not need to enter anything here unless changes are required.
NOTE: The Ship To City/State/Zip will usually be blank because that information is in the third line of the Site Address. This will not cause any problems with Invoice Accrual.
Comments are optional.
Click Next to continue to the Details screen.
![]() If you get the message 'Invoice Number
is not Unique for the Selected Vendor', the invoice may have already
been accrued from Receiving. Go
to Manage Invoices and look under Unassigned invoices.
If you get the message 'Invoice Number
is not Unique for the Selected Vendor', the invoice may have already
been accrued from Receiving. Go
to Manage Invoices and look under Unassigned invoices.
A unique Invoice Number is required for each invoice per vendor to prevent paying the same invoice more than once by mistake.
o If there is a valid reason why the same invoice for a vendor needs to be processed more than once, you will need to make each invoice number unique (possibly by adding additional characters at the end). Check with your finance department if you have any questions on local policies that may apply.
When you click
the  button, you will be taken to the next screen in Accrue
Invoices: Invoice Details.
button, you will be taken to the next screen in Accrue
Invoices: Invoice Details.